Wednesday, 21 August 2013

How to Embed Pinterest Pins Into your Posts in Blogger?

Be The First To Comment
Embedding Pinterest pins on your blog is not a delicate task anymore.  Through Pinterest developer’s tool, you can embed pins into your content without following any complex procedures. Pins are displayed in a smallish square along with the significant details of the pin’s contributor. Pins are interactive, and users can re-pin your content directly from your website.  Therefore, today in this article, we will show you How to Embed Pinterest Pins Into your Posts in Blogger. 

  • http://www.mybloggerlab.com/2013/03/why-your-blogger-blog-was-deleted-or-removed.htmlhttp://www.mybloggerlab.com/2013/03/why-your-blogger-blog-was-deleted-or-removed.htmlPinned by Syed Faizan AliOnto Blogger Tricks
  • http://www.mybloggerlab.com/2013/03/how-to-properly-rename-or-delete-labels.htmlhttp://www.mybloggerlab.com/2013/03/how-to-properly-rename-or-delete-labels.htmlPinned by Syed Faizan AliOnto Blogger Tricks
  • First of all go to business.pinterest.com/widget-builder/ and sign in into your Pinterest account. The Pinterest developer page mainly consists of a widget generator that probably will assist you in embedding pins into the content of your website. Now you will see a plenty of options to play with but since, we are trying to embed pins in our website, so you have to go for “Embed Pin” from the widget builder.
    To embed a Pinterest pin in your website, it is necessary to have a proper URL which should be pointing to your selected pin. Just open any pin that you like to embed in your website, and copy the full URL appearing in the address bar of your browser.
    Now get back to the Pinterest widget builder, just paste the pin URL in the widget generator which you copied in the previous step. After pasting the URL, press the preview button to generator the code which you will insert in your blog.  
    On pressing the preview button, you will see a demo of your pin along with the two codes which you have to insert in your blog.  Now go to Blogger.com >> your site >> Add a new Post >> HTML Tab >> and paste the code where you would like to see the pin to appear. Now publish your article, and that’s it. 

    Alternative Method:

    If you know basics of HTML coding, then you can use our alternative method. This method is a lot simpler, but it requires you to have a bit familiarity with HTML coding. It doesn’t mean you need to be an HTML expert but a little likeness is always profitable.
    First go to Blogger.com >> your site >> Add a new Post >> HTML Tab >> paste the following code where you would like to see the pin to appear.
    <a data-pin-do="embedPin" href="http://pinterest.com/pin/48343395972563829"></a>
    <script type="text/javascript" src="//assets.pinterest.com/js/pinit.js"></script>

    Replace http://pinterest.com/pin/48343395972563829 with the URL of a pin which you want to embed on your site. After customizing press the publish button and that's all.

    We hope this article would help you in embedding Pinterest pins in your Blogger blog. If you have any question related to this topic then, we encourage you to comment below and share your precious views with all of us.

    Randomize Background Colors of Blogger

    Be The First To Comment
    Decorating your website with attracting colors has always been the first priority of a blogger. Uses like attractive designs they want to see things in an appropriate manner. In fact, those websites which has laboriously old appearance, finds it difficult to get any sorts of user engagement.  This is the reason, why people always prefer Professional templates and themes for their website. Recently, one of our readers requested us on twitter whether she can use random background color every time someone reloads the page. Therefore, today in this article, we will show you How to Randomize Background Color of your blog through jQuery in Blogger. 

    Following is a rough screenshot of the request which we received from one of our reader via twitter. At first we thought it is quite impossible, but lastly we were able to pull it off so without any further due let’s directly get to our tutorial. 
    The first thing you need to do is to add a JavaScript file to your template. So, go to Blogger.com >> your site >> Template >> Edit HTML >> Proceed. Now within the template, search for the ending </head> tag. After finding the ending </head> tag just above it pastes the following JavaScript coding and press “Save Template” button to finish the process. 
    <script>
    $(function() {
        function randomColor() {
            return 'rgb('+Math.round(Math.random()*255)+', '+Math.round(Math.random()*255)+', '+Math.round(Math.random()*255)+')'
        }
        $('body').each(function(i) {
           $(this).css('background', randomColor());
        });
    });
    </script>
    Now, whenever you or someone else would navigate your site on every page they will notice different background color. The colors would keep on rotating automatically, until or unless you remove the script from the template.
    We hope this small but useful trick would help you in adding some extra spark to your blog. Every time you load it, you see a new design. Our team is currently working a script that could help you in rotating Image backgrounds every time someone reloads the page. Feel free to leave your suggestions by commenting below.

    How to Host CSS and JavaScript Files in Blogger using Google Drive?

    Be The First To Comment
    Hosting CSS and JavaScript files on your Blogger blog has always been a matter of concern for a webmaster. People prefers to add their entire StyleSheet coding in one file, so they can upload it to their hosting and can easily apply it on their website.  Unfortunately, blogger has quite a few limitations that stop you from hosting CSS and JavaScript files. Recently our user sent us an email asking: is there any way to host files on blogger? What are the advantages of hosting CSS (StyleSheet) files?  Luckily, Google Drive provides you the opportunity to host CSS, JavaScript and HTML Files for FREE. In this article, we will show you How to Host CSS Files with Google Drive in Blogger?

    Why to Host files on Google Drive?

    • Lots of Space: Google Drive provides you 5 GB storage to regular accounts so you can easily upload lots of documents. However, if your disk space is full, then you can upgrade your account from basic to premium. 
    • Create & collaborate: Google Drive provides you the flexibility to create and host different kinds of spreadsheets and presentations. Make some edits in the documents and see real-time changes as they appear. 
    • Reliable & Dependable: With 100% uptime, it provides you the freedom to host anything that you like. It has unlimited bandwidth, but you have to take care of your disk space it should not exceed 5GB mark or you can upgrade your account.
    • Go back and revise: Google drive tracks almost all the change that you make to your document - so whenever you will save a document, a new revision also gets save. You can take a glance back and can make revision accordingly. 
    • Share or make files Private: You can share your files and folders with anyone. Select whether others can comment, share, view or edit your stuff. You can handle everything instantly from your dashboard. 
    • Security at its best: Google Drive has always proven to be the most reliable free hosting service with unlimited bandwidth. Moreover, to provide full proof security Google drive has utilized HTTPS encryption to keep your documents secure.
    • All This For Free: All these impressive features for free.

    What are the Advantages of Hosting CSS/JavaScript in one File?

    Blogger doesn’t provide its users the flexibility to host CSS or JavaScript files in one separate link. They are hosted within the website’s coding through HTML Tags. 
    For StyleSheet, <style> tag is use to define the style information for an HTML document.  Between two <style></style> tags, CSS coding is placed which specify how HTML elements should render in the web browser. Each HTML document can contain multiple <style> tags. 
    For JavaScript <script> tag is use to define the script, such as JavaScript. The <script> tag either contains the scripting statements or it points to an external file through src attribute. Each HTML document can contain multiple <script> tags. 
    Combining all StyleSheet/JavaScript coding in 1 file helps a website to load faster. Furthermore, it helps search engine to crawl your site smoothly. 

    How to Host CSS Files with Google Drive in Blogger:

    There are several third-party apps that could help you to host files in blogger including Google Apps, Google Code, and Google App bot. At MyBloggerLab, we use App bot, but the process of hosting files on Appbot is a lot complex. Google Drive is perfect and works better than Appbot because there is no need to worry about the bandwidth. 
    Step#1: Copying CSS Coding From You Template:
    To host your CSS file with Google Drive in Blogger, first thing you need to do is to copy your all StyleSheet coding from your template to an empty notepad. Go to Blogger » Your site » Template » Edit HTML » Proceed and search for the <b:skin><![CDATA[ tag. On finding this tag, you will see a large chunk of CSS coding, so copy all the CSS coding till the ]]></b:skin> tag.  For more details see the following screenshot.
    Step#2: Preparing a style.css file
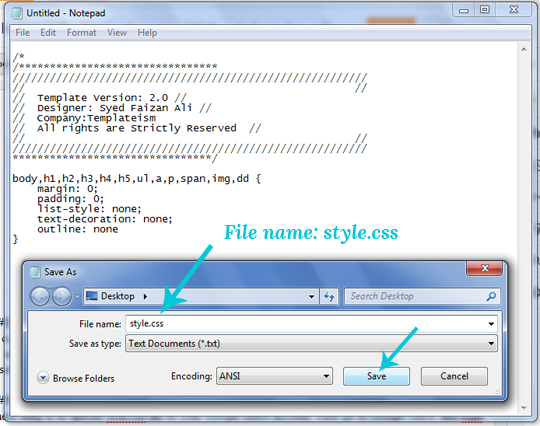
    After copying the CSS coding, remove it from your template and paste the coding in an empty new notepad. Now save the document and name the file to style.css (the extension of the file should be in .css so the browser can render it as StyleSheet). For more details see the following screenshot.
    Step#3: Hosting your style.css file on Google Drive:
    The next thing is to upload style.css file to your Google Drive account. First go to Google Drive and login into your Gmail Account. Now you have to create a new folder, so you can upload all the web hosting files at one place. Press the “Create” button and from the drop down list select “Folder”. Now name the folder to anything that you like such as webhost, web files and etc. In the end, press "Create" to conclude.  
    Now open the folders that you have created a few moments ago (right click on the folder name and select open). On selecting the upload icon present on the left side of your screen, a drop down list will appear which would provide you two choices i.e. File and Folder. Just select “File” and move to the next step.
    Now it will request you to select the style.css documents that you created few moments a go. After selecting the file, press the open button and move to the next step.
    On pressing the open button a small upload wizard would appear on the right side of your screen. It usually takes a minute or two to upload, but it entirely depends upon the size of your file and the speed of your internet connection.
    Once uploading is done, press the “Share” button. Now you have to make this file available for public. Press change, and select “public on the web” so anyone on the Internet can find and access. Finally, press the Save button to conclude the wizard. For detailed instructions, check out the following screenshot.
    Step#4: Getting a Proper Hosting Link
    The second last step is to prepare a proper hosting link of your style.css file. Right click on the file that you uploaded few moments a go and select “Share”. Copy the whole URL present in the text area under “Link to share”. For more details see the following screenshot. 
    After Copying the sharing Link from google drive, it would somewhat looks like this https://docs.google.com/file/d/your-file-code/. You have to change the copied link to https://googledrive.com/host/your-file-code. Remember: Make sure “your-file-code” remains the same before and after the changes are made. 
    let us do a small demonstration which would help you in explaining better. For Example, if the link of my file is https://docs.google.com/file/d/0B0WJjcJEFNzibXRyZWlwNktKcFk/ so I will change it to https://googledrive.com/host/0B0WJjcJEFNzibXRyZWlwNktKcFk. The only thing which remains the same is the file code.
    Step#5: Adding Google Drive Hosted CSS file in Blogger 
    After preparing a proper hosting link of your file, once again go to Blogger » Your site » Template » Edit HTML » Proceed. Now search for the starting <head> tag and just above it paste the following code. Remember: Do not forget to replace https://googledrive.com/host/your-file-code with your Google drive hosting link, and make sure you have removed the CSS coding from the template as we have mentioned in the step#1. Once everything is done, press the “Save Template” button. 
    <link href='https://googledrive.com/host/your-file-code' rel='stylesheet'/>

    If you are still confused about the process then check out this in-depth video tutorial
    We hope that answered all the related questions like why to host files on blogger, what are the advantages of hosting CSS (StyleSheet) files, and more. If we have left something uncovered, or noticed that we missed something then please leave a comment below.

    How to Create a Professional Blogger Template using Artisteer

    Be The First To Comment
    Blogger has a remarkable Template designer that helps you in customizing your themes and templates. The designer tool helps you to change the background, fonts, color etc, but it does not allow you to change its appearance. Often we get emails from users that how we can design a custom Blogger template without learning HTML or CSS coding?  In most cases, people prefer to hire some developers but a person who is new to blogging, perhaps he is a beginner cannot pay thousands of dollars to a professional web developer. Using Artisteer you can create your very-own custom blogger template within few minutes. Today in this article, we will discuss How to Create a Professional Blogger Template using Artisteer.

    What is Artisteer – Web Design Software?

    Honestly, the combination of CSS with HTML is incredible, but guys who don’t want to get their hands dirty with some confusing coding could always prefer Artisteer. It is the first web based automotive web design software that supports almost all foremost blogging platforms like Blogger, WordPress, Jhoomla and Drupal.  It instantly creates themes and templates for your website through just drag and drop there is no need of HTML or CSS coding. Following are few prominent features of this software. 
    • Allow you to design incredible web templates not in minutes, in seconds. 
    • Create different pages for your website using drag and drop options. 
    • Allows you to either edit an existing theme or create a new one. 
    • There is no need to learn Photoshop, CSS, HTML or any other web designing language.

    How To Create Blogger Templates Through Artisteer:

    The First thing you need to do is to Download and install Artisteer. Just like Codelobster this software is also not a freeware. However, its trial version still allows you to create, export or import web templates so if you want to buy a premium version then it’s your choice because trial version works as good as the paid one. 
    The installation wizard is quite straightforward, just follow the instructions as it guides through the installation. Once installations finishes open the software either from your start menu, or from your desktop.  

    Step#1: Creating a New Blogger Template:

    After opening Artisteer, the next thing is to create a new template document so go to File >> New. Now a new wizard will appear asking you to select a CMS (Content management system). It supports four most popular CMS system i.e. Blogger, Drupal, WordPress, DukeNetNuke and Jhoomla. Since, you are trying to create a blogger template, so you would select the “Blogger” icon. However, you can also work on other CMS themes.  Once done proceed to the next step.

    Step#2:  Designing the Header:

    Now you would be able to see a Simple blog theme, using the custom functions you would convert it into a professional theme. To start off you have to design your header area. On the tool bar there is an option known as “Header” just select it as shown in the screenshot below. 
    It will provide you numberless option through which you can change the width, height, background, position and lots of other things in your header. In fact, you can also use ready-to-use Flash and gradient background effects. Doesn’t that sound interesting? You can also use “Suggest Header” tool that assists your design and automatically applies a design that matches your color scheme and style. 

    Step#3: Designing a Perfect Sidebar:

    Every blog has a sidebar that usually appears either on the left or right side of a website. On selecting “Sidebar” from the toolbar, it would provide you a few options. You can change the layout, add two sidebars, and can even customize it appearance. 
    If you wish to add two sidebars in your website select “Layout” from the sidebar menu which would provide you a couple of options such as one column, two columns and three columns. You can select it according to your needs. 
    There are lots of other options like styling and coloring your sidebar. You can experiment all the functions and can create a new thing every time you play with them. However, if you have no idea how to style the sidebar, then you can try the “Suggest Sidebar” tool and this software would advise a few modifications. 

    Step#4: Designing an Impressive Post Page:

    Post pages are the basic need of a website. Without having a proper post design your blogs remain empty or incomplete. To design impressive post pages select “Article” button present on the toolbar. It would take you to a list of options that can help you in creating an ideal post pages for your site. You can Change the Heading style, fonts, color, Blockquote and appearance of your post area. 
    All tools are there to help you, you can experiment each of them and can convert your theme into a masterpiece. 

    Step#4: Designing Other Core Elements of your Template:

    Footer: You can also create a unique footer area for your site using the “Footer” button located on the tool bar. It doesn’t have lots of options for customization, but they are enough to create a decent footer. 
    Menu: By default, you get multi-drop down menus, so you do not code them from scratch. However, you can customize theme accordingly from the “Menu” button. It has a lot of options for customization.
    Background: Using the background tool, you can either upload image backgrounds or can use the custom gradient color backgrounds. You can also add texture to your background using the same tool. 
    Layout: You can either use full-width layout or can select a certain width using the “Layout” option located at the toolbar. You can add border to your layout, texture, and other fascinating stuff to play. 

    Step#5: Exporting Your Blogger Template:

    Once your template is ready, it is time to export so that you can upload it on your blog. Go to File >> Export >> Export Template >> save the file. Remember: The file would be saved in .zip extension, so you need WinRAR to unzip it. The package would consist of two files i.e. the main blogger template in .xml format and a folder of pattern images. 
    We hope this article answered all the related questions like how to create a blogger template without having any CSS or HTML knowledge. If we have left something uncovered, or you know some better method of creating themes then please leave a comment below.

    How to Host Files on Google Code in blog

    Be The First To Comment
    Blogger is in the cloud, so it offers fewer opportunities to its users to host different kinds of files on their website. In other words, you can say that Blogger does not provide a Free Hosting where users can upload core files of their website like JavaScript and CSS files. Keeping that in mind previously, we discussed how you can Host CSS files in Blogger. Therefore, today in this article, we will show you How to Host files on Google Code in Blogger. 

    What is Google Code?

    Google Code is a platform setup for Developers. It is a home of developers where they can upload their APIs and other technical stuff. This site provides a variety of different options, which helps a developer to develop a better application. The perks of using Google code are priceless because they are the only organization which provides you Free Hosting with unlimited bandwidth. Few people consider it as the magical portion for a hardworking developer.

    How to Host JavaScript Files on Google Code?

    The first thing you need to do is to login into your Gmail or Google account. After logging in to your account, go to code.google.com and press “Create a new project” button present at the bottom of your screen. For more details, see the following screenshot.

    Step #1: Creating a Project:

    On pressing “Create a new project button” a new wizard will appear which would inquire few details about your project i.e. Project name, description, and etc.  Below we have discussed each of them in a systematic order (the way they are arranged on Google code).
    Project Name: In the text area, you have to write the name of your project. Keep in the mind, whatever keywords you will enter in the box would act as the URL of your development. For example, you entered "mybloggerlab" as the project name, now when you will upload files they can only be accessed through this URL mybloggerlab.googlecode.com/files/example.js. Therefore, write a unique and meaningful project name.
    • Project summary: Here just write a little more about your development, it should not be more than 5 to 6 words because it is just a short summary of your plan.
    • Description: Write a detailed description of your development in this area because it is not necessary otherwise you would face errors. 
    • Version control system: In this area you would notice three options i.e. Git, Mercurial and Subversion. Out of these three options you have to select “Mercurial”. 
    • Source code license: It depends on you which license you want to select for your development. However, people mostly prefer to label their project as “MIT License”.
    • Project label(s): Give one or two labels to your project, so you can easily search and access them later. 

    Step #2: Uploading Files on Google Code:

    After entering the details of your file press “create project” button and it will take you to the development dashboard which will help you to manage your assignment. To upload files, go to Downloads >> New download and upload your files.
    Now enter details of your file i.e. File name, description, and etc. Select the file which you want to upload make sure its size should not be more than 200MB. Also keep in mind you get 4,096 MB total quota per project so do not exceed the limit. 
    Once everything is done, press the “submit file” button to upload your file correctly on the Google code severs. 

    Step #3: Getting the File URL:

    The last step is to locate the URL of your file. On the Downloads area, you will see the file which you uploaded a few moments ago.  Select the name of the uploaded file, and it would take you a new page. 
    On the new page again left click on the file name and select “Copy link location” or “Copy link address” depends on the browsers of different companies. This link is what you would need whenever you would try to host a file through your blogger Edit HTML section.

    We hope that this guide helped you to understand how you can host your files on Google code in blogger and how it works. You may not need this guide at the moment but it near future you can always make use of it. 

    How to Add Google Pluse Commenting System in Blogger

    Be The First To Comment
    After the recent improvement in Blogger template HTML Editor, Blogger is all set to release a much anticipated enhancement, and that is Google+ Comments for Blogger. Sometime comments do makes a difference. Not only it helps you to create a stronger bond with your readers but also increases user engagement. It is considered as the core element of a website because it could make or break your credibility.  However, if your commenting system is not unusual then, users may not leave a comment on your website. Today, in this article, we will show you How to Add Google+ Commenting System in Blogger blog.

    Features of Google+ Commenting system?

    Now you all would be curious to know what does this new system brings to you. We would discuss its every aspect so that our users can quickly decide whether it is good enough or they should continue with their current commenting system.
    1. Interactive Interface:  Comments appear in a systematic order on the basis of published dates so that users can reply or plus one with ease. While commenting, you would feel as if you are chatting with your friends because it is interactive and instantly updates the comments.

    2. Public or Private Comments: Now your readers would be able to post a comment publicly or privately to the people in their Google+ circles. In addition, when people are browsing the comments they can view all or them, most voted ones, or only from the people in their circles.

    3. All Activity at one Place: Whenever someone would share your content on Google+ or they would pass-out an opinion, it would automatically display them in your Comment Feeds. For example, if there is a discussion going on about your content on Google+ then those comments, replies, and entries would also appear on your Blogger blog.

    4. Also Share to Google+: When someone leaves a comment on your site, he is not only just writing his views, but he is helping you to gain more audience by sharing it to the peoples in his circle. For Example, if you post a comment, it would publicly appear on your Google plus profile too. However, user scan uncheck the “Also share on Google+” option to stop sharing.

    5. Edit or Delete Comments:  You can now edit or delete your comments. Through the flexibility options of Google+ you can easily edit or delete them anytime, anywhere and everywhere. You can’t be serious, aren’t you?

    How to Add Google+ Comments in Blogger?

    We are sure you all are curious to install it on your Blogger site.  Firstly, you need to connect blogger with your Google+ profile. After connecting your account, go to the “Google+ tab located on your site".
    Now to enable Google plus comments you need to check (tick) the box next to the “Use Google+ Comments on this blog” text.
    Incase Google+ comments are not working on your blog, don’t get terrified because you just need to tweak your template. Go to Blogger.com >> Template >> Edit HTML >> Format Template. Now within the template coding, search for <div class='post-footer'> and just below it paste the following coding. Once everything is done, save the template.

    <!-- MBL Tweak  (www.goodbloggercafe.blogspot.com) -->
    <div class='cmt_iframe_holder' data-viewtype='FILTERED_POSTMOD' expr:href='data:blog.canonicalUrl'/>

    Congratulations, Google+ comments are now added to your site.

    Some Frequently Asked Questions:

    Do I need a Google+ Account to Comment?
    Since, this system is powered by Google+ so before you can post a comment it is must for you to first register a Google+ account. A Lot of bloggers are still not using Google Plus, so before you integrate this system in your site keep in mind that not every guy in this world uses Google Plus. However, if your site largely targets Google Plus users then, just go for it.

    Why Google+ comments are not working on Custom Blogger Templates?
    Almost all custom Blogger templates are made by different developers, so this could be the reason why it is not working on your site. However, you can tweak your theme, and it would start working just fine. We have explained everything above.

    If I use Google+ comments, my old comments would be removed?
    After applying this system, you can still see your old comments live on your site, so there is nothing to lose but a lot to gain.

    Conclusion:

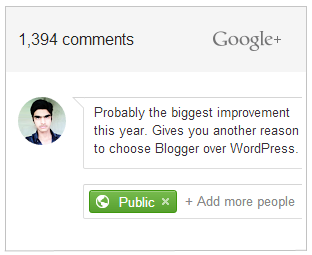
    This week, blogger engineers are very-much hyperactive as they have rolled out two back-to-back improvements. First, HTML Template Editor, and now Google+ comments for blogger.  The recent consecutive enhancements are quite impressive and have made things a lot easier for users. Probably, this development gives you another reason to choose Blogger over WordPress. What are your thoughts about it, are you happy with it? Leave your views below.

    How to Use Blogger and Google+ Comments System Together With Toggle

    Be The First To Comment
    Google+ comment is a cool new and improved commenting system for blogger, which allows you to create a strong bond with your readers. This new commenting system not only provides extra coverage but also brings additional engagement to any Blogger site. This system provides them the flexibility to share and discuss much more quickly. However, before anyone could leave a comment, they have to get themselves registered on Google plus. It would work for some users, but not everyone wants to put barriers around their site and content. Who does not like freedom?  Same thing applies here too. You do not want to force your visitors to starting using platform because, you are endorsing them. Today in this article, we will show you How to create toggle Google+ and Blogger comments in blogger
    We have created a toggle method that would allow you to enable the new Google+ Comments, but without losing your old Blogger commenting system. Users can continue to comment like they use to do in the past but Google Plus users can hit the “G+” toggle button and can comment, share and view the activity you post has had using that.

    What are the Disadvantages of Google+ Comments?

    First and foremost  to use this feature, it is must that a person should have an account on Google plus otherwise he cannot leave a reply. Now not every single person on this earth is using this platform so this probably would annoy your visitors. 
    Secondly, this commenting system depends upon the URLs. Unlike Facebook Application ID, it does no stores anything in your API. You would lose your all previous comments if you change the URL of your article or think about re-branding your domain. 
    It does not send notifications to your Email Address whenever someone either leaves a reply to your blog or posts a new comment. On the other hand, all comments are published instantly without any review so it may become an ideal place for Spammers.

    The Solution:

    Step#1: The first thing you need to do is to backup your template. After logging in, from the dashboard go to Template >> Edit HTML. Now enable the HTML Editor’s built-in search box and search for the following code.  (Quick Tip: Click anywhere on the HTML editor and Press CTRL+F to enable the search box).

    <b:includable id='threaded_comments' var='post'>
    .
    .
    .
    .
    </b:includable>
    Step#2: After finding the code mentioned above, replace it entirely and accurately with the Following code. (Remember: Make sure that the tags are properly closed otherwise you would face errors).

    <b:includable id='threaded_comments' var='post'>
      <div id='com-header'>
    <h6>Comment With:</h6> <img class='com-on' id='com-norm' src='https://blogger.googleusercontent.com/img/b/R29vZ2xl/AVvXsEgO3yZmhye8c1QH4WwRrnU4I4xveJIms_sqYzK3OlhFb7q8yVg-E0X2gFVO85MG6n2JXH-7I_HrYyu1jLtGIf96i33qbq0Y6xUSpEe5Fq6I2MipGyxas_OYuJlqJut-jKIFAruuUqsbSpDE/s50/blogger_on.png' title='view Blogger comments'/><h6>OR</h6> <image id='com-gplus' src='https://blogger.googleusercontent.com/img/b/R29vZ2xl/AVvXsEgR-pk_g5o44JHdSAeG0WvDhbJ0uhSCM3pKkeF_FbKUc6Hh_jdJw2p6B3rF43Pg8yBrRUneGgKRLFH-M8bmeMkt0_93izWiU2gpDzTpcnvAyNU-hHMyv4FFPfIf5q9NMxmU9HPOA81k-jhi/s50/plus_off.png' title='view Google+ comments'/><h6>The Choice is Yours!</h6> 
    <div id='copyrigtsmbl'><a href='http://www.mybloggerlab.com/2013/04/ow-to-use-blogger-and-google-comments-together.html' id="mblrights">Get This Widget</a></div>
    </div>
    <div id='comment-zone'>
      <div class='comments' id='comments'>
        <a name='comments'/>
        <h4><data:post.commentLabelFull/>:</h4>
        <div class='comments-content'>
          <b:if cond='data:post.embedCommentForm'>
            <b:include data='post' name='threaded_comment_js'/>
          </b:if>
          <div id='comment-holder'>
             <data:post.commentHtml/>
          </div>
        </div>
        <p class='comment-footer'>
          <b:if cond='data:post.allowNewComments'>
            <b:include data='post' name='threaded-comment-form'/>
          <b:else/>
            <data:post.noNewCommentsText/>
          </b:if>
        </p>
        <b:if cond='data:showCmtPopup'>
          <div id='comment-popup'>
            <iframe allowtransparency='true' frameborder='0' id='comment-actions' name='comment-actions' scrolling='no'>
            </iframe>
          </div>
        </b:if>
        <div id='backlinks-container'>
        <div expr:id='data:widget.instanceId + &quot;_backlinks-container&quot;'>
           <b:if cond='data:post.showBacklinks'>
             <b:include data='post' name='backlinks'/>
           </b:if>
        </div>
        </div>
      </div>
      <div id='gcontainer'><div id='gcomments'/></div>
    <script src='http://apis.google.com/js/plusone.js'/>
    <script src='https://googledrive.com/host/0B0WJjcJEFNziQU01STJVc3RzeWc'/>
    <style>
    #gcontainer {
    display:none;
      }
    #com-norm,#com-gplus {
    cursor:pointer;
    padding:0 5px;
    float:left
      } 
    #com-header { 
    border: 1px solid #d2d2d2;
    padding: 10px;
    float: left;
    width: 580px;
    margin-bottom: 20px;
    background: #f5f5f5;
      }
    #com-header h6{ 
    font-size: 20px;
    text-transform: uppercase;
    font-weight: bold;
    float: left;
    padding-top: 15px;
    margin: 0px;
    margin-right: 7px;
    margin-left: 7px;
      }
    #copyrigtsmbl {
    float: right;
    margin-top: 20px;
    border-top: 1px solid #d2d2d2;
    margin-right: -10px;
    padding-right: 10px;
    padding-top: 5px;
    padding-left: 10px;
    border-left: 1px solid #d2d2d2;
    padding-bottom: 5px;
    margin-bottom: -10px;
    font-size:11px;
    background: #fff;
      }
    #copyrigtsmbl a {
    text-decoration:none;
    color:111!important; 
      }
    </style>
    </div>
    </b:includable>
    Step#3: Now once again with the help of search box look for the following code.
    <b:includable id='comment_picker' var='post'>
    .
    .
    .
    .
    </b:includable>
    Step#4: After finding the code as prescribed above, replace it completely and properly with the Following code. (Remember: Try to close the tags properly, so the template does not catch any errors).
    <b:includable id='comment_picker' var='post'>
      <b:if cond='data:post.forceIframeComments'>
        <b:include data='post' name='iframe_comments'/>
        <b:if cond='data:post.showThreadedComments'>
          <b:include data='post' name='threaded_comments'/>
        <b:else/>
          <b:include data='post' name='comments'/>
        </b:if>
      <b:else/>
        <b:if cond='data:post.commentSource == 1'>
          <b:include data='post' name='iframe_comments'/>
        <b:else/>
          <b:if cond='data:post.showThreadedComments'>
            <b:include data='post' name='threaded_comments'/>
          <b:else/>
            <b:include data='post' name='threaded_comments'/>
          </b:if>
        </b:if>
      </b:if>
    </b:includable>

    Step#5: After applying the instructions as mentioned above press the “Save Template” button located at the top of your screen. 
    Congratulations: You have successfully added Google+ commenting system to blogger without removing the previous blogger commenting system.

    Conclusion:

    By Enabling both commenting system, you are not forcing your users instead you are giving them the freedom to choose their most preferable platform. It does bring a lot of benefits to both you and your readers. Let us know what you think about the new tweak? Make sure to come back to this page if you come across any issues!

    Copyrights: We have added a Credit-back attribution is this gadget. However, if you have good reason to remove the credit then you have to purchase the premium version of this plugin. Just give us an email and our team would assist you through the process.

    Thanks to +David Kutcher Who helped us in Developing this Gadget.

    IMPORTANT: To make Google plus and blogger comments appear together it is necessary that a post must have at least 1 comment. Those posts which have 0 comments would continue to display your default commenting system. Remember: (There is no need to Enable Google+ comments from your setting. If you have already enable it then disable it before you apply this tutorial).
     

    © 2011 Good Blogger Cafe - Designed by Mukund | ToS | Privacy Policy | Sitemap

    About Us | Contact Us | Write For Us